This page is dedicated to explaining some of the terms, techniques, and processes I use when designing a piece of jewelry. It is here to help you understand and keep my descriptions of individual pieces from being so lengthy. I hope it helps, and if you have any questions, just contact me and I will try to help you.
Oxidizing: I usually apply liver-of-sulfur (LOS) to my pieces after I have finished making them. This solution consists of very hot water and LOS. The piece is placed in the solution until it turns a very dark brown. Copper reacts to this by turning almost black. Silver can be colored rainbow colors if one is paying attention to it. But usually silver will turn a very dark grey. The piece is then rinsed in clean water and left to air dry – usually over night. When it is dry, I use 0000 steel wool to remove the oxidation. The result is the high spots come back to the original color while the recessed areas retain the dark oxidation. When you see sterling silver with very dark areas around coils, the piece was oxidized and then cleaned to reveal the brighter metal.
Flame-Painting: This is another way to color metal instead of using LOS. It is fun but also highly random. One never knows exactly what color the metal will be until the metal has cooled completely. The technique involves using a torch to gently heat the metal until it starts to change color. It works very well on copper and brass. This technique is usually applied at the end the construction. It must be sealed or the finish can wear off or disappear completely.
Annealing: This is a process which is applied to almost every metal forming technique. In order to make metal more malleable, it must be annealed first. I use this on brass, bronze, copper and sterling silver. The metal is heated to a soft glow (that’s very, very hot!) and then quenched in clean water to cool it. The result is a piece of metal which is pliable enough to hammer or form. To stay away from all the technical jargon about molecules lining up and so on; every time you handle metal, it will work harden – making it too stiff to work. Thus, annealing has to be done in order to make it pliable again. This process can be done hundreds of times if needed without harming the integrity of the metal.
Fold-Forming: This technique consists of taking a piece of sheet metal, annealing it, folding and then hammering/forging the fold. It is then annealed again to open the fold. It can be done several times to the same sheet depending on the desired form you want to achieve. Copper is the most popular metal to use as it lends itself to the annealing and forging well. Thicker gauge sheet metal is quite difficult to work with, so many metalsmiths use thinner gauge sheet. Fold-forming strengthens the form so thin gauge sheet is usually used.
Forging: An easy term to explain – any time I hit some metal with a hammer! A very therapeutic way to releive stress.
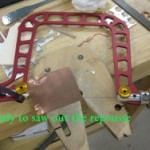
Piercing: Some metalsmiths love to saw and pierce. I haven’t reached that point yet. Piercing involves laying out a pattern on the metal sheet, drilling a tiny hole in the metal, inserting a tiny saw blade in the hole. attaching the blade to the saw and sawing the area of metal you want to remove. This technique is used to cut areas of the pattern which are inside the pattern as shown in the picture.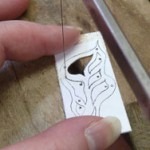
Reticulation: A mesmerizing technique and very time consuming. This technique uses reticulation silver (usually 20% copper, 80% pure silver). A higher copper content is needed to achieve the desired effect. The process involves heating, quenching, scrubbing in that order for 10 to 15 times. This process lifts the copper to the surface of the metal. It must be scrubbed off each time in order to leave more silver exposed. This first process is called depletion guilding. When the depletion is complete, what is left is a fine layer of pure silver. Next, the sheet is heated until the silver begins to melt; the flame is removed and what happens is since the copper melts and the silver melts at different temperatures and cools at a different rate, the metal sheet starts to wrinkle. This gives some exquisite texture. Of course, the masters of this technique can make calculated designs, but most of us who try this are simply ecstatic if it even wrinkles! I have done this and have my reticulated sheet in a very safe place and use it sparingly in my jewelry!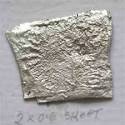
Etching: This technique has so many ways to do it. I personally use ferric chloride or ‘iron salt’ as the mordant. This mordant will only etch copper, brass and bronze. The metal has to be squeaky clean and then a resist is applied. The resist can be Stayz-On rubber stamp ink, black sharpie ink, red paint pen, or a design can be copied on to PNP paper and then heat applied to the metal. The metal is then submerged in the ferric chloride solution until the desired depth of the etch is achieved. The clean-up is where the real work begins. The etched piece must be scrubbed clean of all the mordant and resist and the mordant must be disposed of in an eco-friendly way. It is messy and not a lot of fun to clean up, but the results are totally worth the effort. Silver and sterling silver can be etched with ferric nitrate using the same steps mentioned above. More experienced metalsmiths use nitric acid for silver etching.
Roll Printing: I use this technique quite a bit. It involves using a rolling mill. There are a lot of rolling mills out there ranging from a few hundred dollars to several thousand. Of course, the high-end mills would be a dream to have, but regardless of price, they all do the same thing. I use my humble mill mostly for applying texture to sheet metal. It involves annealing the sheet and then rolling it with a pattern plate through the mill. The result is an embossed sheet of whatever was rolled with it. The neat thing about this is just about anything that is flat or can be flattened can be used to emboss. I have used brass texture sheets, laser cut paper, file folder paper cut in different shapes, lace, and feathers to name a few. As long as the pattern source is dry and not steel, it can be used for patterns in the mill. What fun! And it creates some fantastic designs!
Chain Maille: This is a technique using hundred of jump rings. There are hundreds of patterns now. Some are simple and some are just plain impossible to figure out! This technique originated in ancient times when warriors needed protection from those pesky swords, arrows and spears. The original chain maille weave is quite dense and heavy – very suitable to ward off pointy things! Over the centuries, people have expanded this technique into beautiful and sometimes airy weaves. There are artisans dedicated solely to chain maille and I tip my hat to them. It is tedious and time consuming, but the results are truly gorgeous.
Hill Tribe: I use Hill Tribe beads and components in some of my designs. The beads are made by small tribes in Thailand. The silver content of these beads is much higher than our sterling silver. They are guaranteed to be at least 97% silver as opposed to USA sterling which is 92.5% silver.
Vintaj Brass: I use Vintaj brass in several designs. This company is based in the US and all of their products are made here also. There are many copycats out there, but they are not the same quality of these components.
Resin: I use Ice Resin for all my pieces where resin is used. It is jewelry-grade resin. It will not yellow over time. This resin also has a nice window of using time so I don’t have to rush a project. The only drawback is the cure time. It takes 24 hours for it to completely harden and 5-6 days to totally cure.
Metal Clay: This is a fairly new medium and it is gaining in popularity by leaps and bounds. When it first came out, traditional metalsmiths snubbed it as an easy, lazy way to fabricate jewelry. They have changed their mind. Metal clay used to be solely precious metal clay or fine silver. The silver was mixed with an organic binder and the metal clay was shaped just as you would regular clay. It was then fired either by a torch or kiln. The binder burned completely away, leaving a pure silver piece. This is still true today. Now, however, we have copper clay, bronze clay, steel clay, sterling silver clay and I’m sure I’ve missed some. It comes in wet clay form or powdered form which allows a person to mix just the amount of clay they need for a project. I can go on and on about this medium, but, suffice it to say, I can’t wait to start a project using metal clay. The possibilities are totally endless and the clay just keeps getting better and better.
Cabochon: This is a the term used by jewelry artists and lapidary artists for a stone which is essentially domed on one side and flat on the back. It has no holes drilled in it for stringing purposes. The lapidary artist’s job is to select rough stone (sometimes actually digging it), slicing it into slabs, and then looking at the designs in the slabs, checking for any fractures or weaknesses, and then cutting a shape. From there, the shape is refined and it is then ground with several grinding wheels which have a progression of finer and finer grits until the stone is ready for its final polishing. Quite a process and it takes a steady hand, a good eye, and a lot of patience to be a lapidary artist. So, you may look at some of my pieces and think well, it’s just a rock; but it is much, much more! Some of the cabochons I use are from rocks or material no longer available. Many of the cabochons are pretty expensive, as they are high quality and cut very well. I am learning every day about stones and lapidary work. I have spoken with one of the top lapidary artists in the United States. When I was choosing some of his stones in Santa Fe, he looked at my tray of stones and said “You have a good eye.” That made me feel like I actually knew what I was doing! So much to learn, so little time……
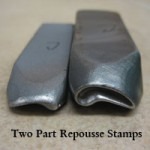
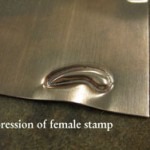
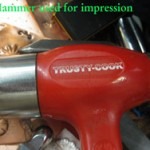
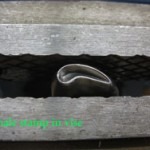
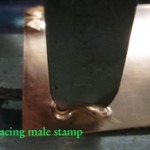
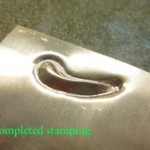
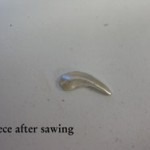
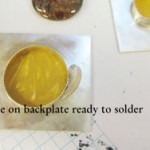
Repousse Stamping: I have taken a few pictures of the process. After the piece is sawed out, it has to be refined to take saw marks out and to smooth the edges before it is soldered onto the backplate. Obviously, I would place more pieces on the backplate for decoration before soldering. I solder all the tiny pieces at the same time while holding my breath hoping I won’t melt the whole thing and have to start over!

Martha, your designs have always been outstanding! Now so is your website! Awesome!
Thank you Leo! It was a fun project!